Why is this necessary to have a local server
Because WordPress files are written in PHP, and that is a server-side language, and WordPress runs on top of it. Since the server-side application only, run on a server with the PHP interpreter. Therefore, if you don’t have a server at your home, it’s necessary to download one for you. To read a script written in PHP, you will need not only a server, but also a database, and interpreters for PHP. There are four main Web server packages that you can download that have all the above: Mamp, Wamp, Xampp and Lamp. All of these packages include the Apache HTTP server, MySQL database and different interpreters for PHP. The main difference between all of them is the operating system that they are designed for. Mamp was created for the Mac, Wamp was made for Windows, and Xampp is designed for all operating systems and Lamp is designated for Linux.
To make a long story short, by downloading one of these packages you will have a local server on your computer that can run WordPress without the need to being connected to the Internet.
So, in summary here is what you have to do to get a local server onto your PC:
Download Mamp – for MacDownload Wamp – for Windows
Download Xampp – for any operating system
Download Lamp – for Linux
Let’s demonstrate how to install “Xampp” (for Windows) because it can also work on any other operating system that many people have today.
Installing Xampp
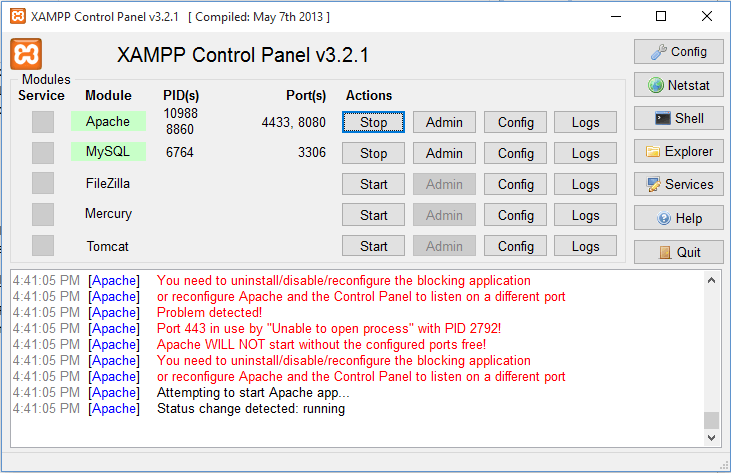
Run the installer and let the process run until it completes. Run the package, and a control panel will open, start the Apache and MySQL and wait until both indicators turn green.
Most likely that your Apache won’t start, do not be alarmed at this, it is a very common occurrence, it happens in almost 95% of the installations. This is because Apache “demands” a whole port for itself and it if it cannot get one it does not come up. By default, it tries to grab port 80. This is rude of Apache! Since these days, almost every user has Skype, and by default, Skype’s port is 80, as well. Fortunately, Skype isn’t as picky as Apache, and it listens on port 80 along with other apps and programs. So, instead of searching and changing all the programs we listened to port 80 it’s just better to change Apache’s port and give it a port of its own.
Your Dream Website Awaits!
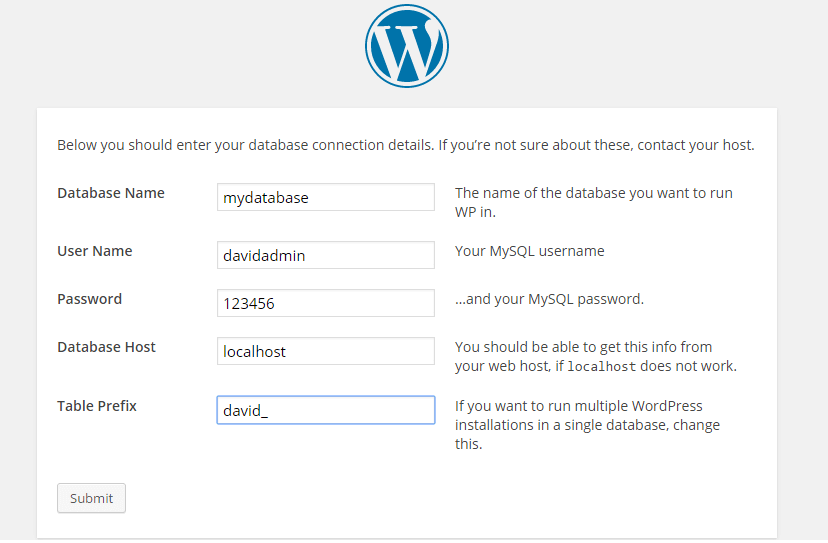
Next, you need to download a copy of WordPress and run its installer next. WordPress will ask you to give it the following information while you are installing it:
- Database name
- Database username
- Database password
- Database host
Setting up the database information
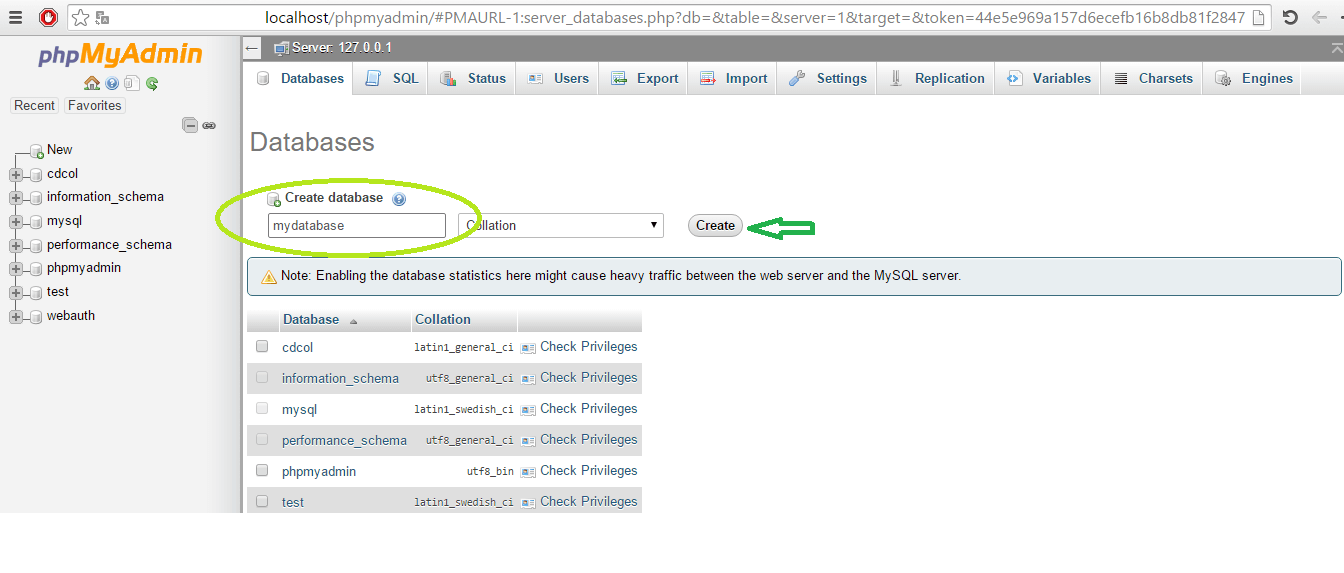
- Open your favorite browser and right: “localhost” in the URL section. This will take you to Xampp’s dashboard. In the navigation bar, you will find “phpMyAdmin,” it’s in the top right corner. Click on it, and it will take you to the phpMyAdmin control panel. This is where you set up your local server’s database and create the database information.
- Press on “database,” it is the first button in the navigation bar. Then set up a name for your new database, I called mine “my database,” you can call yours whatever you like. Next, click the button that says, “create.” That’s all there is to it, and now you have a database and a database name it is just that simple.
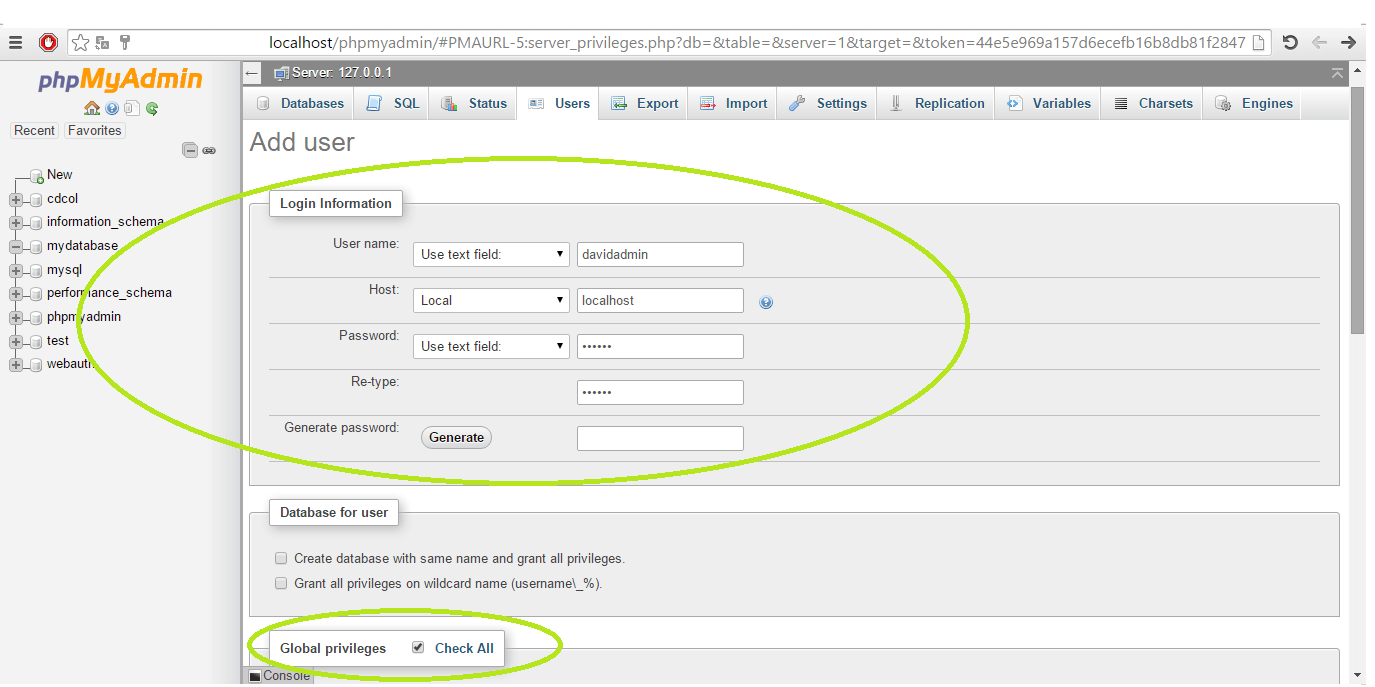
- The next step is setting up the other database information. So, you click “users” in the navigation bar, if you cannot find it just click on the “phpMyAdmin” logo and it will take you to the main control panel again, and you will find “users” there. Locate “add user” and click on it. Choose your login information like username and password. For “host” choose “local” and then, “localhost” automatically shows up in the field. Make sure you check all in “global privileges.” Scroll down the page and press “go.”
That’s all you have to do you have all the information you need to install WordPress on your local server.
WordPress installation
To install WordPress, you will need to go to WordPress website and download the necessary files. They will come to you as a zip file. Extract the WordPress file and transfer it to “htdocs” file, which is inside your Xampp local server file. Unless you change the location of Xampp’s directory when you install it, you should find it located at C:Xampphtdocs.
Now followed these last steps:
- On the URL line, type localhost/WordPress. Continue until reaching the point where you need to fill out details. This is where you use the information you used in “phpMyAdmin.” If you’re wondering, what “Table Prefix” is, don’t worry about it, just put anything on the line except the “wp_” which is the default.
You can also fill out these details in the source files if what you just tried didn’t work properly, changing the source file manually, is a good alternative if filling out this form doesn’t work.
- After submitting the information there will be one last form to fill out, this is a WordPress account, and it’s not the same as the database user that you created earlier. Fill it out; it will be your administrator name and password to get into the WordPress dashboard to change the design and content of your website.
WordPress is now working!
Now you can use your WordPress account to log in and “Presto” you are in and up and running! The next time you want to go on your website just type in localhost/”site name” or localhost/WordPress in URL line of your browser. You can determine the website’s name when creating the WordPress account and you can also change it later the on the dashboard; it’s the name of the file that you transferred into the htdocs file. Changing the site’s name will change the files from “WordPress” to whatever you named it.
There, you are done, you can now work with the website and change things to your heart’s content until everythig is just the way you like it to be transfered to a live server for testing and use. Please feel free to look at our other articles here, and we’re sure you’ll find more tidbits and help to make you a better Web Developer.

